This is a new topic in 12.03.
This is a new topic in 12.04.
Content highlighted in yellow is new in 12.03.
Content highlighted in blue is new in 12.04.
Attaching a Tax Invoice
After the main contractor has submitted a payment schedule for a non-RCTI order, you must attach a tax invoice and submit it back. You will receive a notification whenever a payment schedule requiring a tax invoice is submitted unless you have disabled them in Notification Settings.
To attach a tax invoice to a payment schedule:
-
Open the Payment Schedules grid. Payment schedules requiring a tax invoice have the invoice status “Awaiting Invoice”.
-
Right-click the payment schedule you wish to attach a tax invoice to, or left-click the schedule and click the menu icon
 , then click Attach Tax Invoice. This opens the Attachments tab of that payment schedule.
 -
Click Browse to open File Explorer and find the tax invoice document, then double click the invoice or select the invoice and click Open. Alternatively, drag the invoice onto the payment schedule window.
-
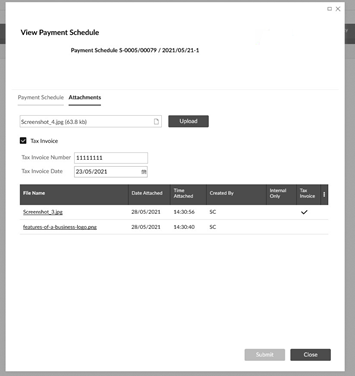
Once you can see the file name where the Browse button was, tick the Tax Invoice tick box to indicate that this attachment is a tax invoice. Two new fields will appear below.
-
Enter the Tax Invoice Number and the Tax Invoice Date – both are mandatory if the invoice is to be attached successfully. The Tax Invoice Date cannot be before the valuation date or after the present day.
-
Click
 to upload the invoice. If successful, it will appear in the grid and there will be a tick in the Tax Invoice column to indicate that it is a tax invoice.
 -
Click
 to submit the tax invoice to the main contractor. If successful, you will receive a confirmation message.
Second Opportunity Invoice
Once you have submitted a tax invoice to the main contractor, the main contractor has a chance to review the invoice. If they disagree with part of it, they may mark it as In Dispute. In this case, you will have the chance to submit a second opportunity tax invoice. The second opportunity tax invoice, once submitted, will supersede the original invoice, but both will remain visible to both the main contractor and the subcontractor for audit purposes. You will receive a notification whenever a tax invoice is marked as In Dispute unless you have disabled them in Notification Settings.
To attach a second opportunity tax invoice to a payment schedule:
-
Open the Payment Schedules grid. Payment schedules requiring a second opportunity tax invoice have the invoice status “In Dispute”.
-
Right-click the payment schedule you wish to attach a second opportunity tax invoice to, or left-click the schedule and click the menu icon
, then click Second Opportunity Invoice. This opens the Attachments tab of that payment schedule. -
Click Browse to open File Explorer and find the tax invoice document, then double click the invoice or select the invoice and click Open. Alternatively, drag the invoice onto the payment schedule window.
-
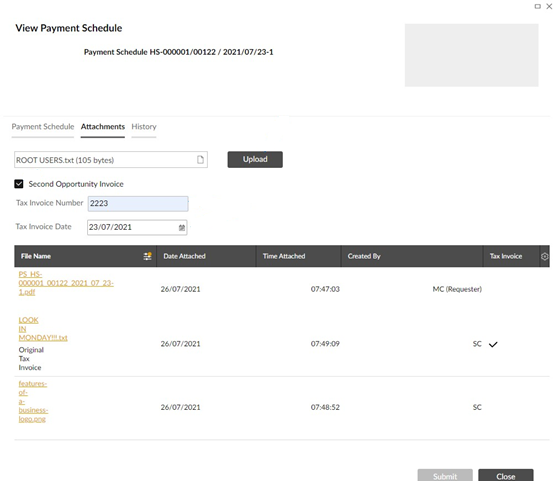
Once you can see the file name where the Browse button was, tick the Second Opportunity Invoice tick box to indicate that this attachment is a second opportunity tax invoice. Two new fields will appear below.
-
Enter the Tax Invoice Number and the Tax Invoice Date – both are mandatory if the invoice is to be attached successfully. The Tax Invoice Date cannot be before the valuation date or after the present day.
-
Click
to upload the invoice. If successful, it will appear in the grid and there will be a tick in the Tax Invoice column to indicate that it is a tax invoice. It will also be labelled as a second opportunity invoice in the File Name column.
-
Click
to submit the second opportunity tax invoice to the main contractor. If successful, you will receive a confirmation message.